Every cyclist will experience the occasional dramatic flat, but if you think that’s the only time you’ll need a bike pump to inflate your bike tires, you’re wrong. Even tires that appear to be in pristine condition may slowly leak air over time, usually due to a weakened or damaged valve core or stem.
You may also want to change your tire pressure. Perhaps you’ve gained or lost weight, or you’re taking a new route that requires firmer tires, or you’re off-roading and need more traction so you let some air out.
While tire manufacturers provide a general PSI recommendation, there are many safe and acceptable pressure levels you might choose instead.
Regardless of why you need to change your tire pressure, you’ll need a bike pump to do it accurately.
If you look online or at your local bike shop, you might feel overwhelmed by the sheer number of product options available. At the same time, you’ll probably notice that they fall into two main varieties: floor pumps and hand pumps.
Both varieties can get the job done, and it’s easier to use them than you may think.
Yet, before we can get into talking about the pumps themselves, it’s important to discuss a key feature of your tires. Namely, the valves. Your valves are the point of interface with any pump you use and will play a part in determining how you use them.
Determine Which Type of Tire Valve You Have
Schrader Valve
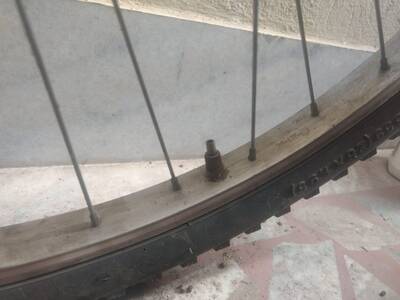
The common choice for children’s and hybrid bicycles, the Schrader valve design is also used on car tires, so it’s likely you have seen one before.
The cylindrical valve stem is usually coated with rubber on the lower portion, while the upper portion is bare metal, threaded at the top to allow a cap to be secured over the opening.
Remove the cap and you’ll find a metal pin in the center of the stem. This is the check valve, and it controls the flow of air in and out of the inner tube. When depressed, it allows air to flow.
Remove pressure from it, and it seals the tube by way of a spring loaded mechanism.
Presta Valve
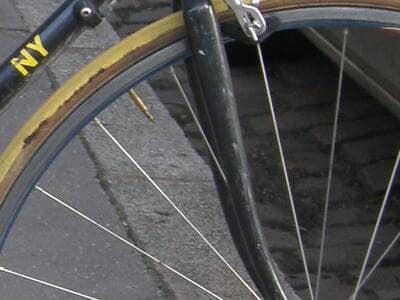
This valve design is newer and was created expressly for bike tires. You’ll recognize it right away from its slender circumference, about half that of the Schrader. Presta valves have an all-metal design — no rubber coating — and may be threaded along their entire length.
The valve opening is secured by a screw, held in place by a nut. Unscrewing the nut allows the screw to be depressed into the valve body, which in turn allows air to flow.
Unlike the Schader check valve, which is spring-loaded, the Presta valve’s seal is maintained by air pressure within the inner tube.
Note: If your tire has a Presta valve but your pump only supports “Schrader Valve” you will need to use adapters; but ideally buy pump that support both types.
Determine Optimal Tire Pressure
While the type of valve you have impacts the inflation process for that tire, it doesn’t tell you how much the tire should be inflated. To make that determination for any given tire requires that you consider the individual tire, and how you intend to use it.
The recommended PSI can be found on the sidewall of the tire. In terms of safety and general performance, sticking to that PSI will be fine.
You’ll find that road bikes typically have much higher PSI recommendations that mountain bikes, and that gravel and hybrid bikes are in the middle.
Narrow tires, such as the 28 mm width found on road bikes, are inflated to higher pressures, between 80-120 PSI. This is because high pressure equals harder tires, which ride better on flat, smooth surfaces.
In contrast, the wider 2.5 in tires typically found on mountain bikes can have a PSI as low as 20-50.
Softer tires have greater traction and are more likely to survive uneven surfaces without puncturing — both very useful for offroad riding.
The chart below provides a simple overview of pressure ranges that you view at a glance.
25-32 mm | 32-38mm | 2-2.5 in | 4 in | |
Road Bikes | 80-120 | 75-110 | 45-60 PSI | 20-25 PSI |
Gravel/Hybrid Bikes | 26-53 PSI | 23-48 PSI | 24-30 PSI | 12-15 PSI |
Mountain Bikes | N/A | N/A | 20-25 PSI | 8-10 PSI |
How to Pump a Bike Tire Using a Floor Bike Pump
The floor pump is the larger, less portable of the two main styles of pumps. It is also the superior option. Floor pumps can inflate a tire to 160 PSI and beyond, which is far more than you will require for your bike.
They allow you to inflate your tires more quickly, as each stroke moves more air than a hand pump can. Weighted for stability, they are also more feature-rich. Floor pumps will always feature a pressure gauge and a locking mechanism to secure the nozzle to your valve, freeing both hands for pumping.
They are also simple to use. Just follow these steps and you’ll have your tire inflated in no time.
Step1: Remove the cap from your valve.
Presta and Schrader valves should have a cap over the tip to protect the mechanism from dirt and damage. You’ll need to take it off and put it somewhere you won’t lose it.
Step 2: Unscrew the sealing nut (Presta Valve Only).
This is the small nut at the tip of the Presta valve that keeps you from depressing the screw and breaking the pressure seal. Unscrew it as far as you can.
Step 3: Test the valve.
Depress the screw or check the valve to allow air to escape (if the tire is at all inflated) just to be sure there is no clog and that the valve is functioning properly.
Step 4: Match the pump nozzle to your valve.
Be certain that you have the correct pump nozzle for the valve. Many modern floor pumps will have two connections in the nozzle head.
The smaller one is for Presta valves, and the larger one is for Schrader.
Step 5: Attach the pump head to the valve.
Fully insert the valve into the pump head, then engage the locking mechanism. This is usually a lever on the back of the head, but it can also be in the form of a button.
Consult your pump instructions for the specifics.
Step 6: Pump until you reach the desired PSI.
For a floor pump, first, plant your feet onto flats on either side of the pump body to keep it steady. Grab the handle of the pump with both hands, then raise and lower it in even strokes until you reach the proper pressure.
Finally, Unlock and remove the pump head, and screw the dust cap back onto the valve.
How to Pump a Bicycle Tire Using a Hand Pump
Hand pumps offer a wider variety of form factors and overall effectiveness when compared to floor pumps. They are useful one the go, and no cyclist should leave home without one to deal with emergency flats.
However, their conveniently small size means they move less air, take longer to inflate a tire, and can’t always reach higher PSIs.
They can also lack the standard features of a floor pump. The pump head may not have a locking mechanism, and there is not always a pressure gauge included. If these features are important for you, make sure they are present on a pump before you buy it.
All that said, inflating your bike tire with a hand pump is still a simple task, requiring only a little more time and effort than using a floor pump.
Follow steps 1-4 from the previous list, as they do not change. Then, do the following:
Step 5: Attach the pump head to the valve.
Fully insert the valve into the correct pump head. If the hand pump does not have a way to lock it into place, you will have to hold it there manually.
Hold it firmly, making sure that you are not bending the valve. Apply steady pressure to ensure that the check valve or screw remains depressed so that air can flow into the tire.
Step 6: Pump until you reach the desired PSI.
Hand pumps are made to be pumped with one hand, while the other hand holds the body in place. Pull and push the piston style pump using steady, even motion until your tire is inflated to meet your needs.
Step 7: Check pressure manually.
This step is only necessary if you don’t have a pressure gauge. For road bikes, your tires should be very firm, barely flexing when you squeeze them.
For mountain bike tires, you want them to be more flexible. The best way to check is to saddle up and see how far out the tires bow under pressure. More than 2 mm or so, and you should add more air.
As before, when you’re done simply remove the pump head and replace the dust cap.
What Type of Bike Pump Do I Need?
The only hard limit a pump will have is the max PSI it can provide. You can’t make a hand pump with a 100 PSI max pressure output 120 PSI. So, make sure to get a pump that exceeds your needs in this area.
Of course, the right pump head is important, and if you are buying a pump, you should choose one that supports both valve types just to be prepared for all cases.
However, adapters exist that can allow you to use a pump on the type of valve you have. This means your favorite Schrader valve pump can be fitted to work on Presta, and visa versa.
As for the choice between floor and hand pumps, ideally you would get both. The floor pump may not be portable, but it will save you hours of time over the lifetime of your bike, particularly if you are an avid rider. Meanwhile, hand pumps are essential when you’re on the go.
If you can only get one of the two, the hand pump is the best choice. It isn’t as fast, easy, or feature rich as the floor variety, but you can use it wherever you are. A floor pump isn’t going to do you any good if you get a flat tire in the rain, miles from home.
Bikes Pumps We Recommend
Don’t already have a bike pump? Here are the three best performing bike pumps in the budget. These are not just easy to use, but also lasts long and is popular among cyclist. If you are out of your luck with your old bike pump this is a great time to replace it with a new one.

BV Ergonomic Floor Pump
Nothing fancy about this pump its simply versatile, cheap and durable. It can be used with both presta and schrander valves.

TOOLITIN Pro 180psi Pump
Made for riders who wants nothing but the best. It last long, is easy to operate, versatile, powerful and good looking.

LEZYNE Bicycle Hand Pump
Appreciated for its speed and efficiency this high volume hand pump is powerful, solid, portable and easy to operate.
Conclusion
Inflating your tires is an unavoidable part of cycling. Yet, it’s arguably the simplest bit of repair and maintenance you can do. Even if you’re not the handy type, you shouldn’t be intimidated by this task. The only tool you need is a pump, and, as you’ve read, they are designed to be straightforward and easy to operate.
Whether you have a floor pump or a hand pump, and regardless of the types of valves on your tires, you can ensure your results will be consistent by simply being careful and methodical when following the instructions above.
Also Read,
How Long Do Bike Tires Last? | When And How To Replace Them
Bike Tire Keeps Going Flat With No Puncture? Learn How To Fix It!





Leave a Reply