There are many reasons why people might need to adjust their bike brake. It could be because the brakes are rubbing on the back or on the front rim of the wheel or maybe they were just misadjusted the first time by a novice bike assembler with good intentions.
In any case, a bike’s brake can be readjusted whether you need them tightened or loosened for either a disc braking system or for a linear v braking system.
About Bicycle Brakes
Here is just a little description of brakes and how they work.
Distinguishing Features
- Handlebar Brake Lever – Engages Brake
- Brake Housing
- Brake Caliper
- Brake Cable
- Brake Pads = Consisting of a breaking compound that is bonded to a backing plate.
How Your Bike Brake Work
A brake cable starts at a handlebar brake lever and travels down through the brake housing unit and all the way down to the brake caliper that has brake pads on or near the rim of a bike’s spinning tire.
When the brake lever is pulled towards the handlebar it engages the brakes by forcing brake pads to apply friction to the rim of a bicycle’s spinning wheel(s) in order to effectively stop or slow down a bicycle’s speed and/or wheels in motion.
Adjustments For A Linear V Braking System
Tightening and Loosening your V Bike Brake
How do you know if your bike brakes need to be tightened or loosened?
Simple. Just squeeze your hand brakes towards the handlebars. The ideal brake will have two finger lengths in between the brake and the handlebar when the brakes are applied.
So if you can squeeze your brake lever all the way to the handlebar then your bicycle’s brakes need an adjustment to tighten them. Likewise, if you can barely squeeze the brake lever before the brakes are applied then your brakes might need to be loosened.
Tools You Will Need
- Allen wrench For tightening and loosening V brakes
- A good pair of pliers
How To Easily Adjust Your Linear Brakes In 5 Steps
With Linear Brakes it’s all about the cable and whether it’s got too much slack in it or whether or not it is too tight.
Brakes Are Too Loose
We start with the barrel adjusters on the handlebar i.e Where the cable runs into the hand brake on the handlebars. If your brakes are too loose then you are going to need to turn the barrel adjusters to where they are open and leave them like that.
This can be easily checked for example If you can squeeze the lever on the hand brake all the way to the handlebar it means your brakes are loose. Test the hand brake and you’ll notice that it helped to tighten the cable. If this fixes the problem then that’s great. If not, move on to step two.
Take the Allen wrench and unscrew the V Brakes above the tire (where the cable runs into the brakes above the wheel) just enough to be able to pull the brake cable tighter.
Pull the brake cable tighter so that the brake pads are resting along the rims. You want to be able to hear them rubbing when you spin the wheel.
Use the Allen wrench again to tighten the brake cable to exactly where it should be. (When it just barely skims over the rim of the wheel without rubbing.)
Now. We left the barrel adjuster open for a reason. So now the rim is just barely rubbing along the brake pads. So when you tighten the barrel adjuster again the brake cable is already tight so it should open up just perfectly. Making your brakes the exact tension that you want them.
Brakes Are Too Tight
Right now you can barely squeeze the brake lever and the brakes are applied. If this is the case then more than likely you’re having some scraping going on with the rim and the brakes on either one side or the other.
Sometimes both are constantly rubbing against the wheel rim or even the tire itself. So we start by seeing if we can tighten the barrel adjusters (where the brake cable goes into the brake lever you squeeze for stopping) and by doing so loosen the brake cable up a bit.
If that helps then that’s great but if it doesn’t or if you can not tighten the barrel adjuster anymore because it’s already tightened all the way or if it just didn’t help that much then continue on to step two.
Using your Allen Wrench you’re going to want to loosen up unscrew the V brakes. (Where the cable runs into the break above the wheel.) Just enough to be able to move the cable. Pull the cable backward without taking it out just enough to loosen up the cable so the brakes are not so tight.
Continue to squeeze the brake lever on the handlebar while continuing to adjust cable tightness until the lever brakes at about two finger lengths distance from squeezing the brake all the way to the handlebar.
This may take time as you work out just the right amount of pressure on the cable for the brake lever to stop at just the right place. When you have the brake cable just right where it needs to be then tighten the V brake back up with the Allen Wrench.
Take it for a test ride and adjust as needed by repeating the process until the brakes are just right or where the brake pad no longer rubs the rim of the wheel when in motion.

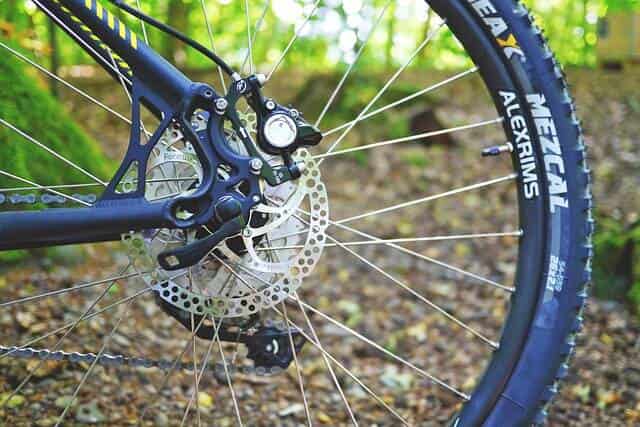
Adjustments For Disc Brakes (Alignment)
Disc brakes can have either one or two lever arms on the caliper. We will discuss adjustments on both types of caliper barking systems.
Tools Needed:
- A Hex Wrench
- Torque Wrench or Torque Wrench Driver with appropriate bits
- Cable Cutter (Just in case of cutting excess cable off and placing a cap on the end)
Single Arm Activated Caliper
Only the outer pads move with this system. For the ones with both inner and outer pad the process of adjusting is slightly different but not by much.
For single arm brakes with both inner and outer pads
- Begin with loosening the caliper mounting bolts. – This will allow the caliper to “float”
- Turn the outer pad adjuster with the wrench all the way out turning counterclockwise. Then turn it clockwise one full turn – This will leave room for further adjusting later if needed.
- Turn the inner pad adjuster clockwise until the pads lock against the rotor. Then align the caliiperbody over the rotor and tighten mounting bolts loosely (Full tightening will occur after satisfactory alignment is confirmed.)
- Loosen both inner and outer adjuster one quarter turn to one half turn.
For single arm brakes with only one pad
- Begin by loosening the caliper mounting bolts
- Turn the inner pad adjuster all the way in clockwise. Then turn in reverse about one quarter turn
- Pull and hold the brake lever tight – Which will automatically align the caliper body to the rotor.
- Loosely tighten the mounting bolts while continuing to hold brake lever tightly -Then release brake lever.
- Turn bolts back another one quarter turn.
Two Lever Arm On 1 Caliper
For double arm activated brakes
- Start by loosening the caliper mounting bolts
- Turn both inner and outer adjusters all the way out (loose)
- Pull and hold brake lever – If lever goes all the way to the grip then release the brake lever and and tighten both pad adjustments one half turn
- Repeat tightening evenly on both inner and outer pads until pad contact is felt two finger widths before touching the handlebar.
- Then loosely tighten mounting bolts to hold the alignment of the caliper body over the rotor. (Full tightening will occur after satisfactory alignment is confirmed.
Final Adjustments For All Disc Bike Brake
The end goal is to get the caliper that is parallel to the rotor to have even gaps on each side of the wheel between the brake and wheel rim and to have a proper feel when pulling the handlebar brake lever in.
Theoretically setting your pads against the rotor should have aligned the caliper correctly. However, it is common that further adjustments be required.
Pull and release the hand brake a few times to check the clearance on the grip.
Make sure the brake lever has strong pressure at a good two-finger width before the brake lever touches the handlebars and feels like it’s adequate to slow and stop the bike. (Make changes to the rider’s preferences by adjusting the pad adjustments and not the barrel adjuster.)
Spin the wheel and check for any brake pad rubbing on the rim or wheel. – If there is no rubbing then tighten the pinch bolts and mounting bolts fully (About 6nm for your mounting bolts and about 4nm for your inch bolt)
Spin the wheel again and if there is any rubbing noise or if the wheel slows too quickly then the brake pads need further adjusting.
Reorient the bike for a better view.
Keep in mind that any adjustments made need to be even and if there is rubbing then the side with rubbing needs to be turned one quarter turn loose until the rubbing is gone and then finish by tightening each mounting bolt and pinch bolt fully.
How Long Do Disc Brakes Last For?
That answer depends on the amount the bike rides and the kind of riding that is done while on the bike. Someone traveling on level ground around city streets will have less wear and tear.
Then someone who travels down a hill fast and may need to apply brakes for speed control or stopping at a significant speed.
Stopping going faster will apply more friction to the brake pads than simple level riding and wear them down faster. But on average without heavy use of the bike – about a year. And with heavy use and higher speeds – anywhere from 3-7 months.
How Can You Tell When Your Bike Brake Need Changing?
The average brake pad material measures at least 1 millimeter thick so if the pads measure less than than 1 millimeter thick or appear to be worn down then it is time to replace them.
Brakes are very important to bike riders and are for the safety and control of the bicycle. Without them, many accidents and injuries can and do occur every year.
Please cycle responsibly and always wear a D.O.T. certified helmet for protection.
How To Stop Your Bike Brake From Rubbing
Bike brakes rub when the brake cable is calibrated too tightly. When you need to stop your brakes from rubbing on the wheel you can adjust the bike’s brakes according to type (Linear V brakes or Disc brakes) and follow the recommended process to adjust your particular type of braking system.
You can fix any mechanical problems deriving from excessive use or misalignment.
First start with the barrel adjuster located at the handlebar brake lever. (The thing the brake cable goes into on the hand brakes) Loosening the knob will tighten the cable and tightening the knob will loosen the brake cable. I know it sounds backwards. Try that first and see if the brakes stop rubbing.
If not we can try loosening the bolt holding the cable on the caliper but first we need to loosen up the barrel adjusters at the handlebars.
You may need an Allen Wrench or a Hex wrench in order to loosen up the mounting bolts on the caliper. (That’s the doo-hickey that the brake cable runs into before the brakes are applied to the wheel) We need to loosen the bolt holding the cable in just enough to be able to slightly loosen it up.
Spin the wheel and loosen cable until the brakes stop rubbing. Squeeze the brake lever on the handlebars and make sure that it’s not too loose and will still brake properly.
Also make sure the hand brake lever feels good applying the brakes.
The brake lever should stop two finger widths before going all the way in to touch the handlebars.
Repeat the process as necessary until the bike brake pads stop rubbing against the wheel and the pressure to the brake lever is adjusted just right.
Then go ahead and tighten up the barrel adjusters on the handlebars carefully so you don’t have to readjust the caliper brake cable…
Also Read,
Best Affordable Mountain Bikes Under $200 | Review & Comparison


Thank you for sharing this