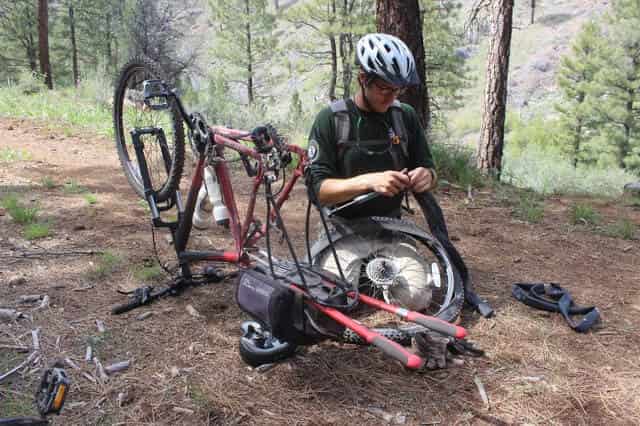
It does not go without saying that biking is one of the most popular sports of our time. But they have their issues too, for example, you may need to remove your rear bike wheel to fix the flat or replace the tire.
No matter how easy it may look but biking reality is certainly not as easy as it looks and is very technical down to the core where only professionals reside.
A brand new bike comes along with its added complexity. The engineering and terminologies of a bicycle can seem nothing less than rocket science to a beginner and can easily demotivate them to drop the hobby.
This article is specifically tailored to reduce your biking complexities. We’ll be sharing biking knowledge in easy steps so it is easier to apply in action.
We will discuss and answer some of the major problems and questions that a beginner needs to know to maintain a bike. From how to change wheels to if you should remove the gear cassette this article will help you to maintain your bike in a professional way so you can have all the adventures with your bike you want.
How To Remove The Rear Bike Wheel Using Quick Release
Now remove your rear wheel with the quick release in 4 simple steps. But you need to first identify someplace to hang your bike or use a bicycle repair stand for the same.
Recomended: Park Tool PCS-9.2 Home Mechanic Bicycle Repair Stand
The first and crucial element of the quick release wheel is of course the quick release installed in it.
If you don’t have any prior knowledge of quick-release other than how it is engaged to action that will be sufficient for the following procedure.
The key element of the quick release is the lever at the end of it, and that lever is a cam action that tightens the wheel into its place.
For quick release to be correctly installed the nut on the other end from the lever should be tight enough so that when you swing from the open position to the closed position you feel resistance at the halfway point.
Put Chain in Highest Gear Position
To remove the wheel firstly you have to remove the chain of the bike as far to the outside as possible and at the same time that moves the read derailleur to the outside as well. Put all this into action by shifting the gear to the highest possible setting.
Once you’re through with the process and got the chain in the highest gear and the derailleur is outboard as much as possible, step two is to open the quick release on the break.
Removing The Rear Wheel
By opening the quick release that will allow the brake pads to move further out so they become less likely to become interference in the process of the removal of the wheel.
Step three now comes the actual removal of the wheels. After rotating the quick release to the extent of it just pull the derailleur back on the other side and simultaneously push the wheel forward finally releasing the wheel from the mainframe of the bike
Putting The Wheels back On
Reinstallation of the wheels is the reverse-engineered process of removing the wheels. You have to drape the run of the chain over the highest gear, which is the smallest one gear on the cassette.
Once done with the process you have to pull the wheel back into the dropouts, remember to bear in mind that at this point the wheel should be fully in the dropouts and the chain is squarely between the chainstays and the seat stays.
After the wheel is placed accurately between the chainstays and the seat stays you have to flip the quick release lever as you should be feeling resistance at the halfway point. Move the lever to the rear end of the bike as much as possible so it does not interfere with the rider’s heel while in action.
After that close the quick release to move the brake pads closer to the rim. And there you have it your wheels are installed.
How to remove the Rear Bike Wheel With No Quick Release
Although when removing the rear wheel of a bike it is almost the same process that is employed every single time with a few minor adjustments here and there according to specific bike structures but removing the rear wheel without quick release can be particularly tricky.
Here is a step by step guide to how to remove the rear wheel on a non-quick release bike in a simple way.
Put Your Chain in Highest Gear Position
The first step is not mandatory but it makes the removal much easier. The very first step is to shift your bike chain so it is in the smallest chainring, the highest gear in the cassette.
The shifter that is on your right-hand side is the one that controllers the gears and it’ll help you to set the chainring into the smallest gear of the rear cassette.
If you use a shifter that has numbers on it just set the chainring to the highest number that corresponds with the smallest gear of the rear while riding your bike. Sifting gears while staying still will not change the gear.
Remove Your Brakes
In the next step, you have to disengage the brakes which will allow the brake pads to become more further from each other in order for a tire, in some cases, they are really wide in which case the speciousness of brake pads come in handy, to be able to fit through that gap that makes the removal of the wheels much easier.
Most of the bikes these days are equipped with V brakes. To disengage V brakes you first have pull the rubber to a side so it does not interfere with the process.
In the next step, you have to squeeze the brake arms together and separate the round piece of metal attached to the left brake arm.
After the round piece of metal is detached from the brake arm you have to release the grip from both brake arms.
Pull the derailleur back and remove the wheel
Releasing the brake pads should give you a lot of room for your tires to pass the brake pads when you are taking your wheels off. Now you are free to take the wheel off.
Removal of the wheels is highly dependent on the kind of brakes that are installed in the bike and various bikes are known to have various kinds of brakes but for each case, the removals process is almost the same.
For example, some bikes even have little clip handles on the rear brakes to increase the space between the brake pads for the quick and less complex removal of the wheels.

What Makes Replacing Rear Wheel Trickier?
It certainly can seem that replacing the rear wheel of your bike is much trickier than the replacement of the front wheel of your bike. Although it is just a game of practice replacing the rear wheel, if not to professionals, is much trickier if you have not spent your fair share of time practicing.
Where front wheels are quite easy to remove, you have to take certain factors into consideration while replacing the rear wheel.
To open a front-wheel you just have to release the breaks, open the quick-release and spin the nob on the other side of the wheel from the quick release to the extent of it. Your front wheel is removed, just as easy as that.
But removing the rear wheel can be tough especially if your bike does not have a quick-release mechanism. Even with a quick-release lever, there are simply more things to consider; be it the wheel, chain, or derailleur.
To start with you need to place the cassette side to the wheel so as it passes in front of the derailleur going under the chain. Then there is the need for making space for the wheel to be removed.
Then you need to make sure the chain is placed on the highest gear or the smallest cog to the right. Be mindful of the quick release valve, check if the concave face is outwards facing indicating its in open position.
Before you make any move to remove the wheel make sure there is enough clearance available. After all, if you gently lower the bike and hold, pull up gently towards you, and slightly jostle the wheel, it should drop right out.
Considering all these rear wheels are indeed trickier to replace.
Wheel Installation
Now so far we have learned how to remove tires from a bike with non-quick release and with a quick release from various breaks and what makes the replacement of rear wheels particularly trickier than the front wheels. And now we are going to learn how to install those wheels back into your bike so you can start using it again.
Front wheels are relatively easy to install than rear wheels as we have stated before. On the front wheel of an open dropout, quick-release make sure that the hub is fully and firmly seated into the fork.
Then you have to tighten the nut while holding the lever making sure the wheel stays in place. The skewer should be tight enough so the lever meets resistance at a 90-degree angle from the frame.
The final position of the lever is important, the lever should be oriented upwards in a position where it can be easily disengaged, not in any danger of getting caught with any foreign objects.
On the rear wheels up the cogs into the loop of the chain. After that pivot to the derailleur back and lift the wheels up into the dropouts making sure that the hub is fully seated.
Then adjust the tension of the quick release until it is equivalent to the front, placing the lever between the chainstays and the seat stays. The lever needs to be fully closed and flat.
On a solid-axle bike tighten both axel nuts to the manufacturer’s recommended torque, typically about 25 newton-meters. In a through-axel bike as with open dropouts make sure the rear hub is fully seated.
Then install the through-axel making sure it is tight. Be sure to reengage the quick-release on any rim brake.
Should you remove the rear cassette?
The removal of the rear gear cassette is not necessary as they are firmly attached to the wheels themselves. Rear cassettes can not be removed unless you are aiming for it.
Every gear in the cassette is firmly attached through a knob that tightens the cassette firmly with the rear wheel.
But in case you are aiming for the cassette removal particularly, you would have to remove the rear wheel from the bike with the techniques that are discussed above.
In order to remove the gears from the wheel first, you have to note that the cassette cogs are separated from each other by spacers.
Spacers can simply be loose or the spacers can be pinned between cogs. To remove the cassette first place the lock ring tool, which should be appropriate for your cassette, on the cassette.
Once you are through with that hold the cassette with a chain whip firmly and use a large adjustable wrench or a one-inch wrench and turn the lock ring tool antilock wise to unlock the nob.
If you use a skewer to hold the tool stop and make sure to remove the skewer before continuing to untighten the cassette. Your cassette is removed.
Conclusion
In the end, it can safely be concluded that maintaining a bike which might seem like heavy work but is not by any stretch of the imagination, complex.
Hopefully, this article has articulately described striker things like removal of the rear wheel to comparatively easy things like changing gears, to our viewer’s understanding.
By learning more from your favorite athletes, with your fair share of practice, and by gaining a little experience about the bike’s anatomy the above-mentioned processes will become easier day by day.
With few adjustments here and there you can have all the adventures you had once dreamed of once. Hopefully, the guidance that is given above will help you to maintain your bike safely so you can meet your biking goals.
Also Read,
How To Remove And Repair Bike Chain Without Special Tool
How To Remove and Change Bike Pedals The Easy Way
How To Remove Rust From Bike | Best Ways To Clean & Get it New!


Leave a Reply