Do you want to raise the handlebars on your mountain bike, but don’t know how to go about it? It can be a daunting task if you don’t have any experience with fixing bikes or without the right tools.
There are a few different methods for raising handlebars on a mountain bike. These methods depend on the type of handlebar set up your bike has i.e Threaded or Threadless seam.
But in general, the process of raising the handlebar requires you to lose the bolts securing the handlebar, adjusting its height, and then securing it back together.
Don’t worry, we are here to help make this seemingly complicated process much simpler!
Here we will explain in detail all of the steps necessary for getting your handlebars higher and make sure that you feel comfortable going up hills when riding your beloved mountain bike.
If you’re a cyclist, you know that adjusting your handlebars is key to a comfortable and enjoyable ride.
But even if you have perfect posture on the bike, there are plenty of other reasons why you might need to adjust your handlebars. Sometimes it’s just a matter of personal preference, while other times it can be a safety issue.
In this section, we will cover the primary motivations for making adjustments – from comfortability to performance optimization – plus dive into all of the details you should know about before starting any work!
Here are some of the reasons why you might need to adjust your handlebars:
1. To Improve Handling And Stability
Handlebar height is an important component of bike handling and stability and is considered a smart move if you want to improve handling and stability on your bike.
Setting your handlebars too high can cause a lack of balance between the front and rear wheel, making it harder to control your bike during climbing or cornering.
Conversely, positioning the bars too low can be uncomfortable for long rides over bumpy terrain.
Adjusting your handlebar height to a lower position helps create a better center of gravity and puts more weight over the front wheel for improved traction.
This also ensures you stay in a more centered position between both wheels for increased bike control at higher speeds, especially when descending fast downhill.
2. Improve Visibility and Head Movement
Mountain bikes by design feature a handlebar fitted slightly lower than the seat. When its too low one may require to hunch over to operate, thus restricting clear vision ahead. In regards to efficiency, it will cost you speed and power as you are restricted by your head movement.
The proper position of a mountain bike rider should be as such to allow for maximum vision and grip with a slight hunch forward to account for your desired center of gravity.
Raise the handlebar if you feel restricted field of visibility or its too low to operate with full control on yourself. A little drop may be helpful with traction but it should never be at the cost of proper vision.
Having an improper vision can soon become a liability to yourself and those around you. Thus always maintain a good riding position that helps reduce the amount and severity of accidents.
3. To Get Maximum Bike Performance
The handlebars of your mountain bike play a huge role in influencing its performance. They must be adjusted to provide the rider with the highest degree of control; this is especially important when navigating rough terrain.
Professional mountain bikers understand this and often choose their handlebar size and type accordingly.
Changing them out when deemed necessary for either an upgrade in performance or for simply having a better fit. It’s essential that you make sure your handlebar is properly adjusted and in good condition.
After all, it will influence your safety on the trail more than anything else- so adjust away and keep your ride running at peak performance!
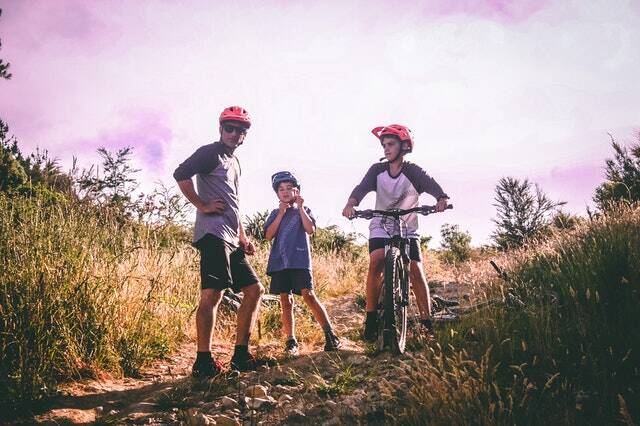
4. To Accommodate For Growing Kids
Does your child have a love for trails? As a dad, you take a huge risk on bicycle-size buying, as for a child or teenager the mountain bike may quickly becoming obsolete.
Now to maintain usefulness of these bikes for your child most dad like you needs to adjust the the handlebar. Sometimes they need to raise the both ( handlebar & seat ) to accommodate for the growth.
Ideally, handlebars to be raised once per year to ensure the usefulness of the mountain bike for your child. However, you may be required to adjust it more frequently to account for your child’s rate of growth. Children between 8-12 years old generally grow faster than those between 12-16 years.
Further, you may also need to adjust the height as you grew older. Those who are aging beyond the ’50s may require to lower the handlebar each 3rd year or so to account for the reducing height.
How To Raise The Handlebars On Mountain Bike
After examining the reasons why some riders may choose to raise the handlebars of their mountain bikes, let’s dive into the practical element: actually implementing it.
Before attempting to raise your handlebar, you must first figure out what type of mtb handlebar you have as this will determine which method should be used.
The two popularly used mountain bike handlebars are known as Flat Bar / Threadless Headset Stem and Threaded Headset Stem or old mtb handlebars with bar ends.
If you own one of these two varieties then you can attempt this task.
Understanding the type of handlebar equips you with the knowledge that is necessary for a successful handlebar lift: as the steps and method you choose to lift your handlebar change based on this information.
If your stem is attached to the steering tube with bolts, it’s likely of a modern threadless design that this guide applies to. Get ready for an easy installation process!
Be prepared with following tools in hand for the job;
A multi-tool or a set of Allen keys
A torque wrench or pre-set Torq key.
Spacers / Stem in Spare ( to use / replace )
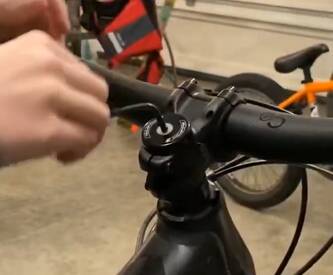
Video / Image Credit:Loam Life MTB ( YouTube – Give your love with Subscribe! )
How To Adjust Handlebar Height Using Spacers In 7 Steps
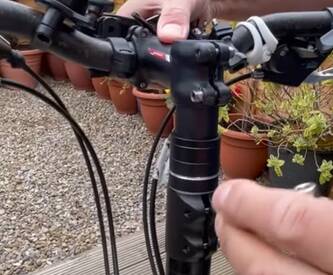
Step 1 :Secure your bike by placing it on a bike stand. You don’t want the bike to move while you are changing the handlebar height. If you don’t have a floor-mounted bike stand, ask someone to hold the bike for you.
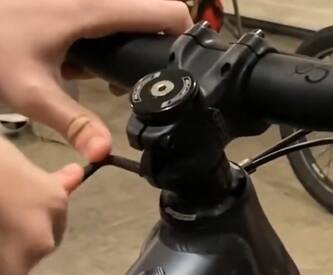
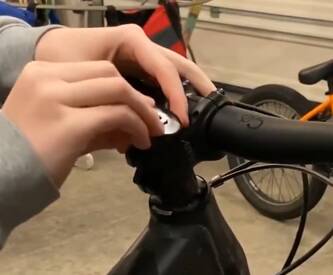
Step 2:Remove the top cap and then use an appropriate-sized allen key to unscrew the stem bolts. You’ll probably need a 4 or 5mm Allen key for this part.
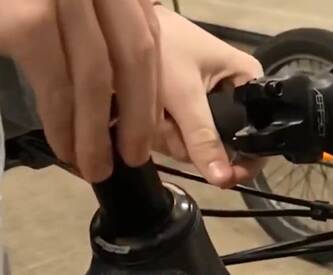
Step 3: Carefully remove the stem from its position in between the handlebars and the steerer tube. Unscrewing the clamp bolts on the back of it should allow you to slide off easily – no force needed!
Step 4: To adjust your handlebar height, you will now use spacers to add or reduce the distance between the stem and handlebar. Begin by adding a few spacers in order to increase the space if you wish to raise the bars, or remove spacers to decrease the space if you wish to lower the bars. You can add or remove spacers as necessary until you have achieved the desired handlebar height.
Step 5:Put the stem back into its original position, making sure that it is properly aligned with the steerer tube and handlebars before tightening it with your allen key.
Step 6: Once you have achieved the desired height, check that your front wheel is aligned with the frame. If it is not properly aligned, adjust accordingly.
Step 7: Finally, use an appropriate-sized allen key to tighten the stem bolts securely to ensure a safe ride. If your handlebars feel unsteady, lightly adjust the stem clamp bolts and top cap to bring them into alignment.
To ensure a smooth turn of the bars with no additional resistance, only make quarter-turn adjustments until you find that perfect fit – don’t overdo it!
Congratulations!
You have now successfully adjusted the handlebar height using spacers in 7 steps. Enjoy the ride!
How To Raise Bike Handlebars Using Stem Raiser In 4 Steps
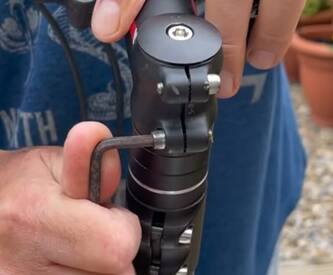
Step 1:Remove The Old Stem by loosening the clamp bolts. Use an appropriate allen key and/or hex wrench to loosen, then remove the existing stem from your handlebar or bike frame.
Step 2:Add a stem riser that is compatible with your stem and handlebars. Line up the stem riser with the top of the handlebars. You may decide to use spacer either just on top or both top and bottom of the stem raiser.
Step 3:Place the existing stem and spacer on top of the steam riser, making sure that it is properly aligned with the handlebars. You can take advantage of spacers to adjust your desired height.
Step 4: Confirm everything is correctly aligned and stem height is appropriate. Check that your front wheel is aligned with the frame. If it is not properly aligned, adjust accordingly.
Step 5:Tighten the clamp bolts to secure your stem, making sure they’re not too tight or too loose. You may have to adjust them several times until you feel they are properly tightened. Be sure to check the tightness regularly and adjust if necessary.
Once you have successfully completed these five steps, your handlebars should be at a height that is comfortable for you. Enjoy your new handlebar setup!
Raising Handlebars With Threaded Headset Seam
To raise the handlebars on a mountain bike with threaded seam, we first loosen the top bolt on the threaded headset seam. Once you loosen the top bolt, the continuous metal piece is free to move up and down.
Once this has been done, loosen the locknut using a wrench. If you loosen it enough, pull the stem free from the bike. Keep in mind what position you want the handlebars to be, as you would not want to pull it out all together. Raise to height what is appropriate for your needs.
Once you figure out the fourth step, assemble it all back together. Reattach the stem. Now its the time to remove some extra grease that you may find on the steam.
In case you find there is too little grease you may need to apply some. From there, you should be able to adjust the handlebars of any kind on your mountain bike.
How To Find the Perfect Handlebar Adjustment
Firstly, figure out what size handlebar is best for you. Generally speaking, the taller your frame, the wider the bar should be. Consider other factors such as intended use and personal style preference when making this decision.
Finding the ideal handlebar height for cycling can be a challenge, but there is an easy rule of thumb to follow. Aim for having your handlebars level with or up to three inches below your saddle at full climbing height – this will get you off on the right foot!
Measure the rise of the handlebar. This will tell you how far above or below your frame the handlebar is. Most handlebars have a rise of 100mm or four inches, but you may prefer something different depending on your height and intended use.
Measure the sweep of the handlebar. This will tell you the angle at which it is bent back towards the rider, either up (upsweep) or out (backsweep). The angle of the sweep will affect your comfort and control while riding.
Make sure the handlebar clamp is compatible with your frame’s stem diameter. Common diameters include 25.4mm, 31.8mm, and 35mm.
Once you have determined the ideal size for you, purchase the correct handlebar and install it onto your frame.
To ensure you get the perfect fit for your mountain bike, take measurements of your existing setup and make sure that any new bar will fit with these specifications.
This will save you time from having to make adjustments later on down the road. With a few simple steps, you can be sure that your handlebar is adjusted for maximum comfort and control on your mountain bike.
Happy biking!
Ready to Raise the Handlebars? ( Conclusion )
So now you know how to raise the handlebars with just a spanner and Allen’s key. You have also learned about its advantages and common reasons for doing it.
It’s finally time to implement what all you have learned so far in this guide to raise the handlebars on mountain bikes. To raise your handlebar all you need is an Allen key, a wrench ( for older models of mountain bikes ), spacers and some precious time to make it happen.
As a final reminder when adjusting the handlebar, do not fix it to the max or minimum height on some gut feeling. Instead pick one that best suit you and your needs.
Try to test more than one position, comparing their plus and minuses to get the most out of your time. If you learn anything from this blog I hope you enjoy making your bike more yours.
Kaye is a mother of two boys who is on a mission to improve her physical and mental well-being. With a passion for trying new beauty products and stacking her supplement intake, Kaye is always eager to discover new ways to enhance her lifestyle.


")


Thank you for sharing